Come controllare i Disk Array HP in ESXi da linea di comando ( HPSSACLI )
Sicuramente vi sarà capitato di trovare uno o più dischi guasti in un server HP con installato l’hypervisor Esx.
La rottura di uno o più dischi è individuabile attraverso gli appositi LED di segnalazione sui dischi o attraverso il VSphere client dove è possibile trovare un alert nell’apposita sezione Hardware Status.
Vi trovate quindi di fronte alla necessità di effettuare un controllo dello stato dello storage array, individuare il disco in avaria e eseguire comandi di ricostruzione del raid.
Solitamente queste operazioni vengono eseguite dal software Windows fornito da HP ( HP Storage Admin ) ma in questo cosa non avendo una macchina fisica ma come detto un Host Vmware Esx è necessario agire attraverso le hpcli da riga di comando.
Se l’immagine vmware installata sull’host è personalizzata HP avete già a disposizione gli strumenti necessari altrimenti dovremo installare manualmente le HP ESXi utilities collegandocy attraverso un client SSH come putty all’host esx e lanciando il seguente comando :
esxcli software vib install -f -v /tmp/hp-esxi5.5uX-bundle-1.7-13.zip
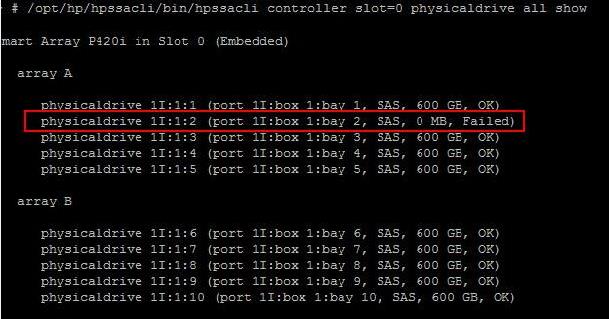
Controlliamo il disco guasto :
Digitare il seguente comando per controllare lo stato dei dischi nel vostro host ESXi . Esso mostra lo stato del disco in tutti gli array configurati nel Controller.
/opt/hp/hpssacli/bin/hpssacli controller slot=0 physicaldrive all show
Dopo aver individuato il disco danneggiato e dopo aver provveduto alla sostituzione lanciando il comando :
/opt/hp/hpssacli/bin/hpssacli ctrl all show status
è possibile vedere l’avanzamento del rebuild dell’array.
Le HP smart Array CLI mettono a disposizione numerosi comandi che permettono di eseguire tutte le operazioni necessari per la manutenzione e la configurazione del Controller. Nell’appendice sottostante travate tutto quanto vi può servire per utilizzare le HPSSACLI.
APPENDICE:
HP Smart Array CLI commands on ESXi
Show configuration
/opt/hp/hpssacli/bin/hpssacli ctrl all show config
Controller status
/opt/hp/hpssacli/bin/hpssacli ctrl all show status
Show detailed controller information for all controllers
/opt/hp/hpssacli/bin/hpssacli ctrl all show detail
Show detailed controller information for controller in slot 0
/opt/hp/hpssacli/bin/hpssacli ctrl slot=0 show detail
Rescan for New Devices
/opt/hp/hpssacli/bin/hpssacli rescan
Physical disk status
/opt/hp/hpssacli/bin/hpssacli ctrl slot=0 pd all show status
Show detailed physical disk information
/opt/hp/hpssacli/bin/hpssacli ctrl slot=0 pd all show detail
Logical disk status
/opt/hp/hpssacli/bin/hpssacli ctrl slot=0 ld all show status
View Detailed Logical Drive Status
/opt/hp/hpssacli/bin/hpssacli ctrl slot=0 ld 2 show
Create New RAID 0 Logical Drive
/opt/hp/hpssacli/bin/hpssacli ctrl slot=0 create type=ld drives=1I:1:2 raid=0
Create New RAID 1 Logical Drive
/opt/hp/hpssacli/bin/hpssacli ctrl slot=0 create type=ld drives=1I:1:1,1I:1:2 raid=1
Create New RAID 5 Logical Drive
/opt/hp/hpssacli/bin/hpssacli ctrl slot=0 create type=ld drives=1I:1:1,1I:1:2,2I:1:6,2I:1:7,2I:1:8 raid=5
Delete Logical Drive
/opt/hp/hpssacli/bin/hpssacli ctrl slot=0 ld 2 delete
Add New Physical Drive to Logical Volume
/opt/hp/hpssacli/bin/hpssacli ctrl slot=0 ld 2 add drives=2I:1:6,2I:1:7
Add Spare Disks
/opt/hp/hpssacli/bin/hpssacli ctrl slot=0 array all add spares=2I:1:6,2I:1:7
Enable Drive Write Cache
/opt/hp/hpssacli/bin/hpssacli ctrl slot=0 modify dwc=enable
Disable Drive Write Cache
/opt/hp/hpssacli/bin/hpssacli ctrl slot=0 modify dwc=disable
Erase Physical Drive
/opt/hp/hpssacli/bin/hpssacli ctrl slot=0 pd 2I:1:6 modify erase
Turn on Blink Physical Disk LED
/opt/hp/hpssacli/bin/hpssacli ctrl slot=0 ld 2 modify led=on
Turn off Blink Physical Disk LED
/opt/hp/hpssacli/bin/hpssacli ctrl slot=0 ld 2 modify led=off
Modify smart array cache read and write ratio (cacheratio=readratio/writeratio)
/opt/hp/hpssacli/bin/hpssacli ctrl slot=0 modify cacheratio=100/0
Enable smart array write cache when no battery is present (No-Battery Write Cache option)
/opt/hp/hpssacli/bin/hpssacli ctrl slot=0 modify nbwc=enable
Disable smart array cache for certain Logical Volume
/opt/hp/hpssacli/bin/hpssacli ctrl slot=0 logicaldrive 1 modify arrayaccelerator=disable
Enable smart array cache for certain Logical Volume
/opt/hp/hpssacli/bin/hpssacli ctrl slot=0 logicaldrive 1 modify arrayaccelerator=enable
Enable SSD Smart Path
/opt/hp/hpssacli/bin/hpssacli ctrl slot=0 array a modify ssdsmartpath=enable
Disable SSD Smart Path
/opt/hp/hpssacli/bin/hpssacli ctrl slot=0 array a modify ssdsmartpath=disable
ISCRIVITI ALLA NEWSLETTER DI PC-GURU.IT
Grazie all’iscrizione ti informerò ogni volta che pubblicherò un nuovo contenuto.
Non perderti nemmeno un articolo!
Iscriviti alla nostra newsletter inserendo la tua mail qui :


